關於如何更換小提琴弦的9個步驟
本期會將更換琴弦所有的步驟分的足夠細緻,讓一個完全的初學者也能掌握。這意味著它看起來有很多步驟,但別擔心,它並不像看起來那麼難。
更換小提琴琴弦包括兩個部分。拆除舊琴弦–每次一根–然後用新琴弦替換。千萬不要一次就把所有的琴弦都拆下來。換完一根弦後,你可以重複其他的弦。
這樣做的原因是,琴橋只是被琴弦固定住了。如果你一下子把所有的琴弦都拆掉,就沒有什麼東西可以固定琴橋了,所以它就會倒塌。除非是經驗豐富的專業小提琴演奏者且能夠熟練的更換小提琴的部件,否則初學者將無法把它放回去。在極少數情況下,甚至音柱也會變得鬆動,這都將自己無法解決的問題。
如果不急於更換所有的琴弦,您可以考慮只換一根琴弦,等上一兩天,直到琴弦不再沉澱和走音。除非你把它們磨合好,否則新琴弦在安裝後的幾天裡會不斷拉伸,如果你把四根琴弦都換了,那麼琴橋會隨著琴弦的拉伸而滑動。因此,如果你把琴弦都換了,要確保琴橋的腳平放在小提琴的木頭上。
第一步 拆除舊琴弦
如果你要更換所有的四根琴弦,在完全只取下一根琴弦之前,要稍微鬆開每根琴弦。緩慢地轉動琴栓以釋放張力,同時用另一隻手握住琴弦。
一旦木栓鬆動,就把琴弦拉出來,然後取下另一端–球或環。把舊琴弦放在信封裡,盤起來,寫上你取下繩子的日期。如果你的繩子斷了,而又沒有新的繩子,它就可以作為替代品派上用場。
第二步 用琴弦蠟潤滑琴軸
檢查音栓是否乾淨,如果有必要的話,把它擦乾淨。然後在上面擦一些琴弦蠟。有時會被稱為其他的名字,如琴弦肥皂,或琴弦化合物。琴弦蠟有一個小管子,就像唇膏一樣。在將琴軸插入孔中之前,將它塗滿整個琴軸。這將有助於你在調琴時轉動琴軸。
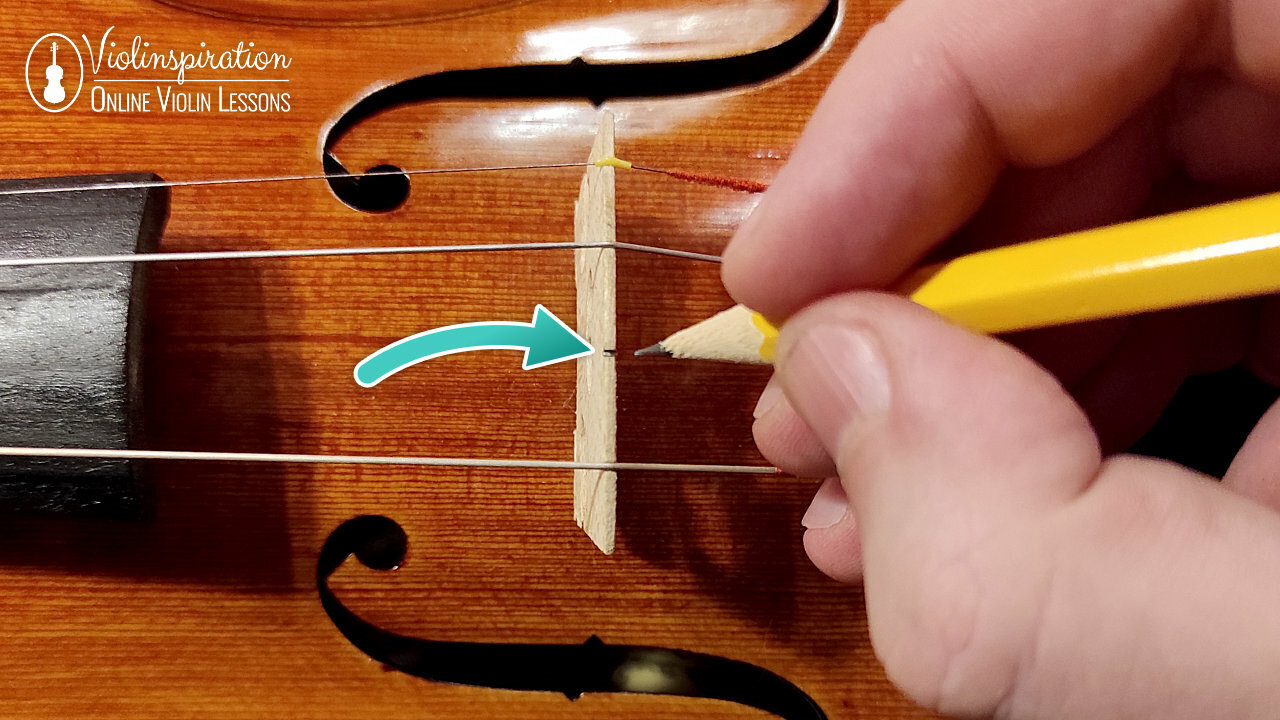
第三步 潤滑琴橋和琴枕凹槽(可選)
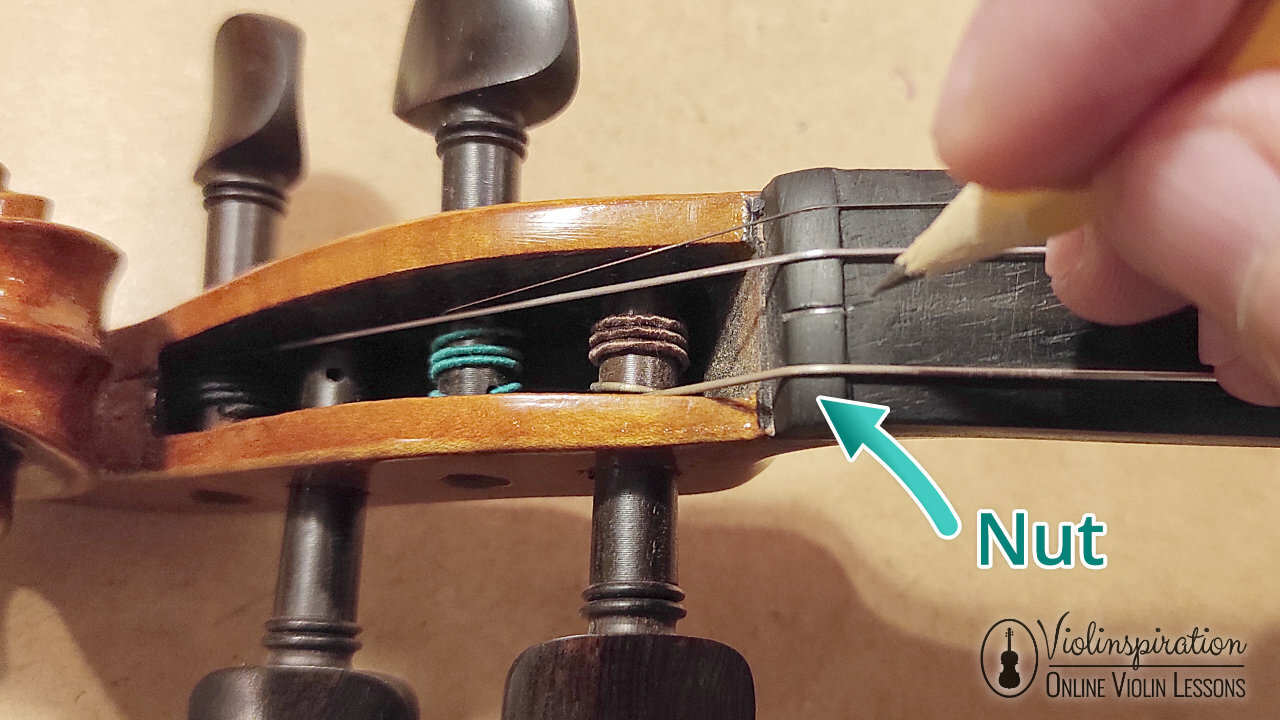
沒有特殊的產品,也不一定需要,但你可以把鉛筆芯抹到琴橋的凹槽裡,再抹到小提琴琴枕的凹槽裡。琴枕是指板和琴軸之間略微凸起的邊緣,它有凹槽來固定每根弦。
有時候,E弦上會有一個琴橋保護器–一個已經在弦上的小塑料管。如果有的話,你可以跳過這一步,因為這個管子便可以保護琴橋。
第4步 找到正確的替換弦
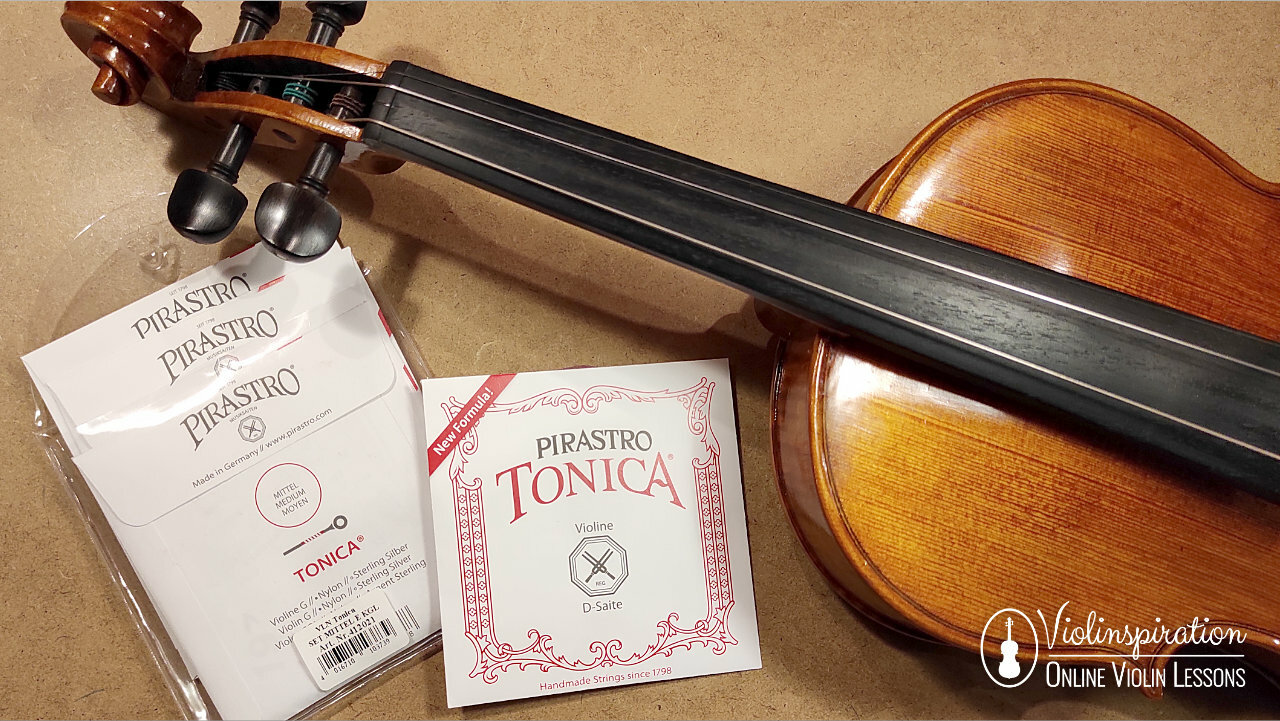
確保你有正確的琴弦,與你剛剛取下的那根琴弦的音高相同,例如用A弦代替A弦,等等。這可能看起來很明顯,但在嘗試做一些新的事情時,很容易就會搞錯琴弦。還要確保你使用的是全新的琴弦,因為即使是從未使用過並保存在包裝中的琴弦也會出現問題。它們的保質期通常為三個月左右。
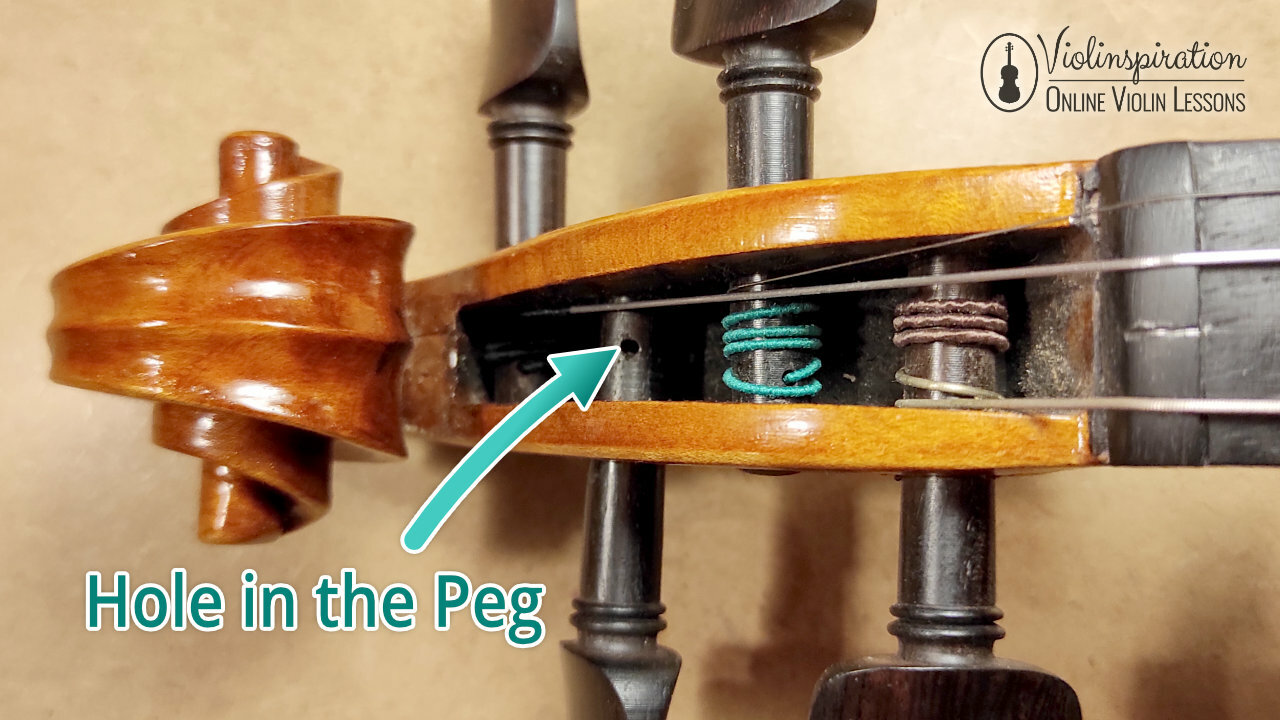
第5步 將琴弦穿過琴軸孔
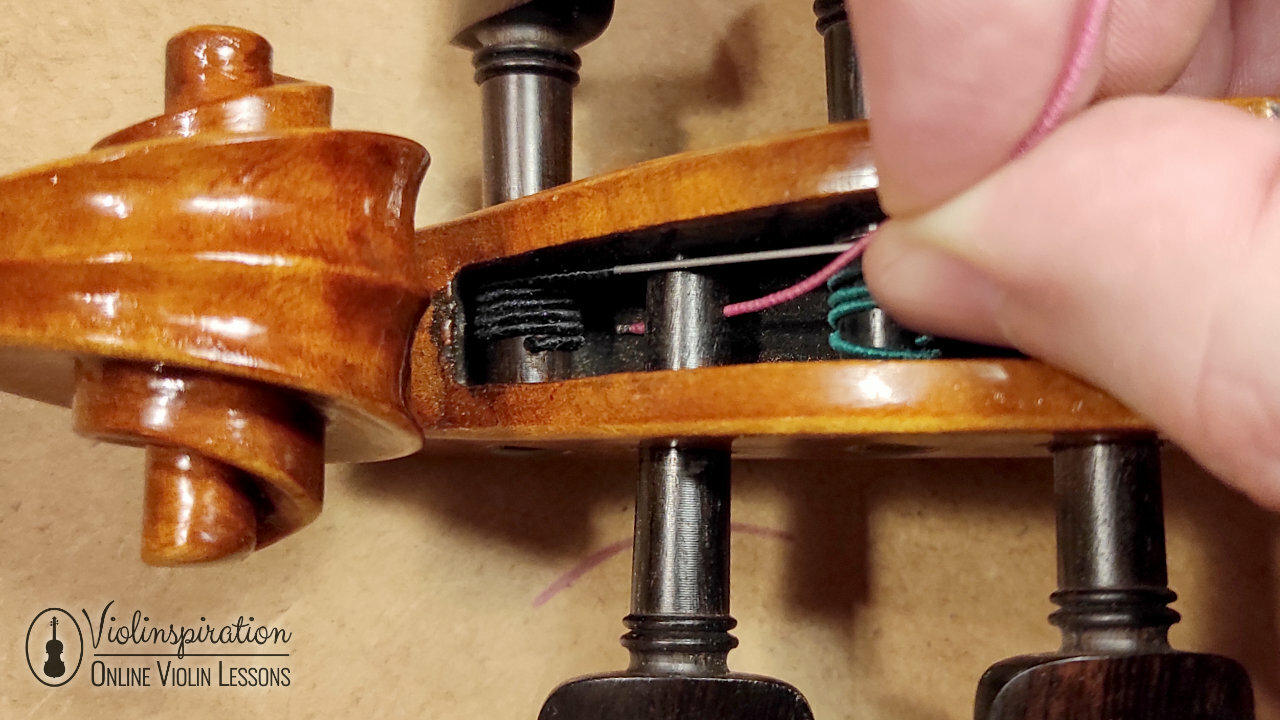
從外面把琴軸插入孔中,直到琴軸上的小孔在釘子盒的內側顯現出來。
將琴弦的一端穿過釘子上的小孔。在另一側留出一小部分,可能不到一英寸(2厘米)或更多一點。琴弦穿過的長度將決定琴弦調好後琴軸的角度。如果以後你想調整這個角度,你可以鬆開琴弦,改變它伸出來的程度。現在,重要的是要有足夠的空間讓琴弦不至於從琴軸中滑出。
沿著小提琴背面的方向轉動琴轴。
當你這樣做的時候,讓新上的弦穿過你留在外面的那部分,這樣它就能把它固定住。繼續以這樣的方式上弦,讓後面的位子在第一個環和琴軸凹槽的木頭之間。這將產生張力,使琴軸不至於鬆開並從琴軸凹槽中拉出。
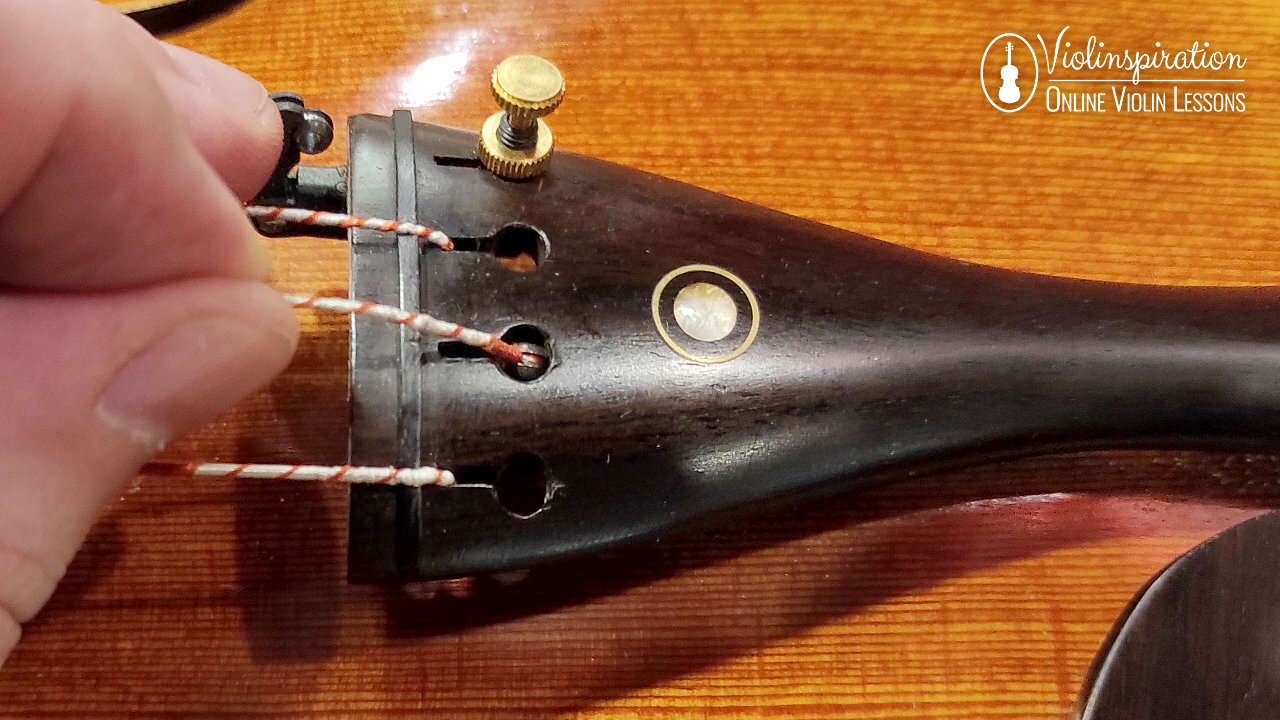
第6步 將琴弦球端插入尾部
一旦你在琴軸上纏繞了足夠多的琴弦,使其安全固定,但又不至於太多,就可以把琴弦的球端插入尾管。
琴弦也可以有鉤狀的一端,它有自己的調節器,但對大多數用戶來說,使用帶球狀一端的琴弦更容易、更便宜。
如果你使用的是微調,那麼球就會鉤在細調音器的兩個棱角之間。否則,它就會滑入尾部的孔中。你可能需要用鉛筆頭之類的東西把弦的一端推到孔裡。
第7步 減少鬆弛
在這一步上,你應該已經有一根兩端都連接好的琴弦,但仍然相對鬆散地掛在琴身上。
用一根手指握住鬆動的琴弦,使其緊繃,這樣可以確保球狀的一端保持在原位,同時你要輕輕地進一步纏繞琴弦,把鬆弛的部分拿掉。慢慢地做,這樣你就可以引導琴弦進入兩端的相關凹槽。
如果這是E弦,而且你的琴弦有一個琴橋保護器,現在你需要確保這個管子落在琴橋的凹槽裡。再把琴弦拉緊,直到鬆弛的部分被消除,琴弦也就安全了。
將琴弦調到大致合適的音高。你可以用調音軟件、在線調音器、電動調音器來檢查,或者用鋼琴或調音叉彈出正確的音。
無論你怎麼調音,都要慢慢地進行這一步驟,以免因過度緊繃而斷弦。
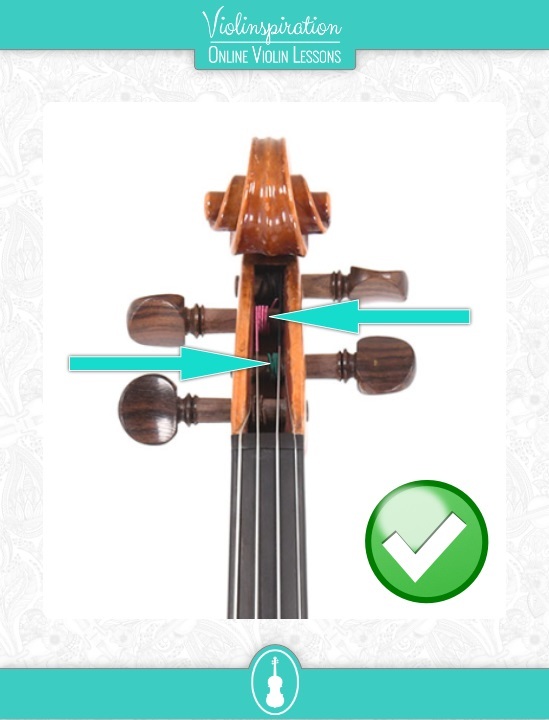
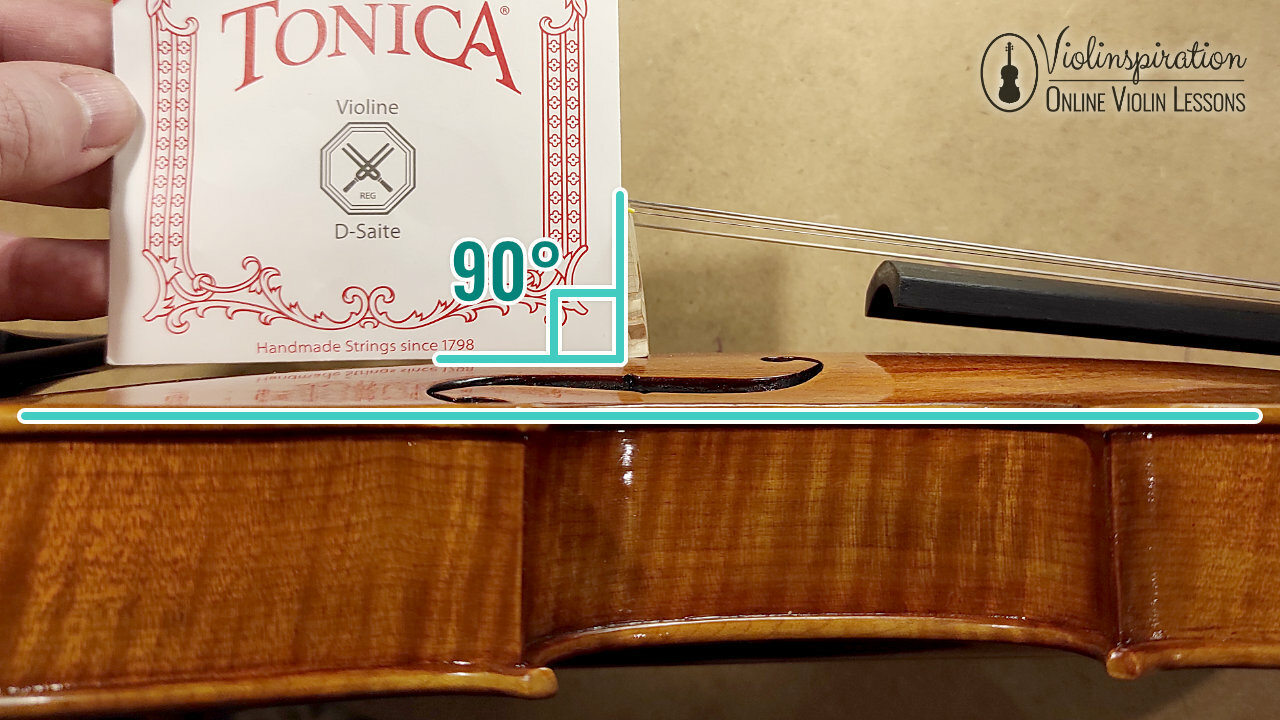
第8步 檢查琴橋是否是垂直的
當琴弦或多或少的調好後,我們需要檢查琴橋是否仍然是直的。無論我們如何小心翼翼地安裝新的琴弦,琴橋還是會出現偏差。要確保它牢牢地平放在木頭上,並且在F孔凹槽之間穿過琴身,而不是斜著的。
第9步 最後的調音
現在你可以把琴弦調到合適的音高,如果你有的話,可以用微調器完成。琴弦需要3到7天的時間來完全定型。在這段時間裡,它們的聲音會很奇怪,而且經常走調。在需要的時候重新調整調音。
音樂就是思想著的聲音。
Music is the sound of thinking.
___________________________________________________________________________________________________________________________________________________________
9 Steps on How to Change Violin Strings
I wanted to break this down enough for a complete beginner to be able to follow it. This means it looks like a lot of steps, but don’t worry, it isn’t as hard as it seems.
When you start this process, you should already have a new set of strings. If you need advice on buying them, check out our store for superb violin strings
Changing violin strings consists of two parts. Removing the old strings – one string at a time – and replacing them with new ones. NEVER remove all the strings at once. After you changed one string, you can repeat the process for the other ones.
The reason for this is that the bridge is only held in place by the strings. If you remove all the strings at once, there will be nothing holding the bridge and so it will collapse. And unless you know what you are doing, you won’t be able to put it back. On rare occasions, even the soundpost can become loose, which is definitely something you cannot fix yourself.
If you are not in a hurry to have all the strings replaced, you might consider changing one string only and waiting for a day or two until the string stops settling and going out of tune. Unless you break them in, new strings keep stretching over the days after fitting, and if you’ve replaced all 4 then the bridge can slip as the strings stretch. So if you do change them all, make sure the feet of the bridge lie flat against the wood of the violin.
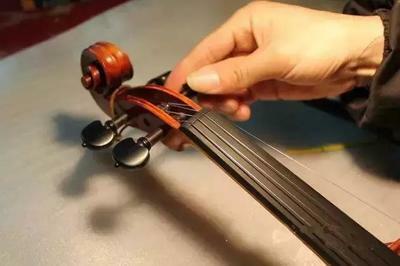
Step 1. Remove the Old String
If you’re replacing all four of them, slightly loosen each string before completely removing one string only. Slowly turn the peg to release the tension, while holding the string with the other hand. Be careful it doesn’t snap back at you.

Once the peg is loose, pull the string out of it and then remove 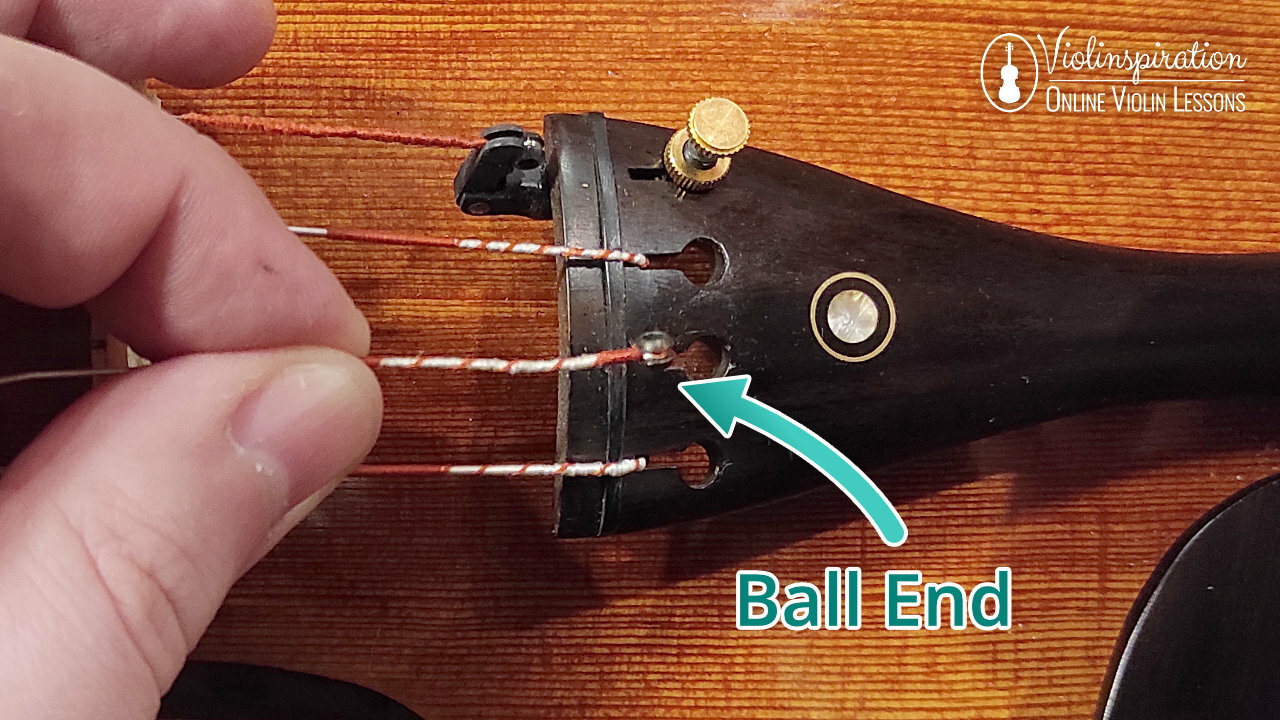 the other end – ball or loop. Save the old string in an envelope, coiled up, with a date of when you removed it. It can come in handy as a replacement if you break a string and don’t have a new one yet.
Step 2. Lubricate Tuning Peg With Peg Paste
Check whether the peg is clean, wipe it off if necessary. Then rub some peg paste onto it. This can sometimes be called by other names, such as peg soap, peg wax, or peg compound. Peg paste comes in a small tube just like lipstick. Rub it all around the peg before inserting it into the hole. This will help you turn the peg when tuning the violin.
Step 3. Lubricate the Bridge and the Nut (optional)
There is no special product for this and it isn’t always necessary, but you can rub the lead of a pencil into the groove on the bridge and into the groove on the violin nut. The nut is the slightly raised edge between the fingerboard and the pegbox, it has grooves in it to hold each string in place.
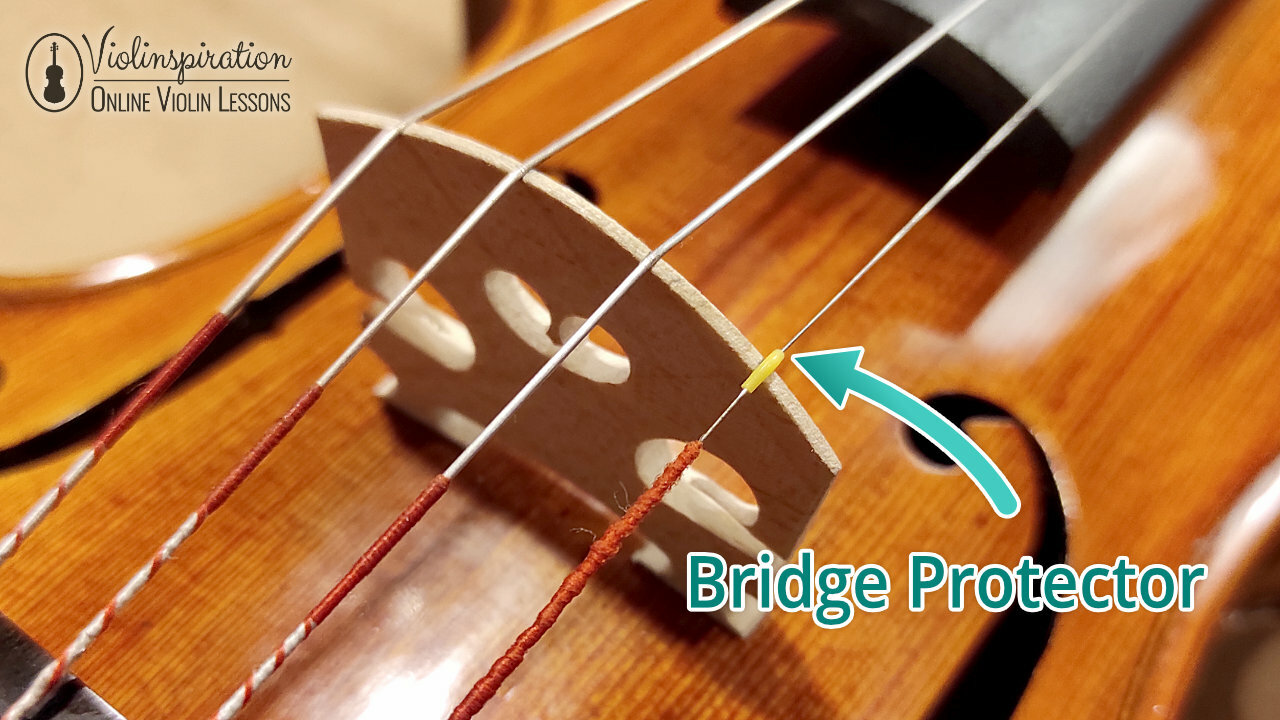
Sometimes the E-string comes with a bridge protector – a small plastic tube that’s already on the string. If it is present, you can skip this step, as the tube will protect and also allow for motion at the bridge. You can still lubricate the nut.
Step 4. Find the Right Replacement String
Ensure that you have the correct string, the same pitch as the one you just removed, e.g. an A for an A, etc. This may seem obvious, but it is all too easy to lose track of things when trying to do something new. Also make sure you’re using brand new strings, as strings go off even if they have never been used and were kept in their packaging. They usually have a shelf life of three months or so.
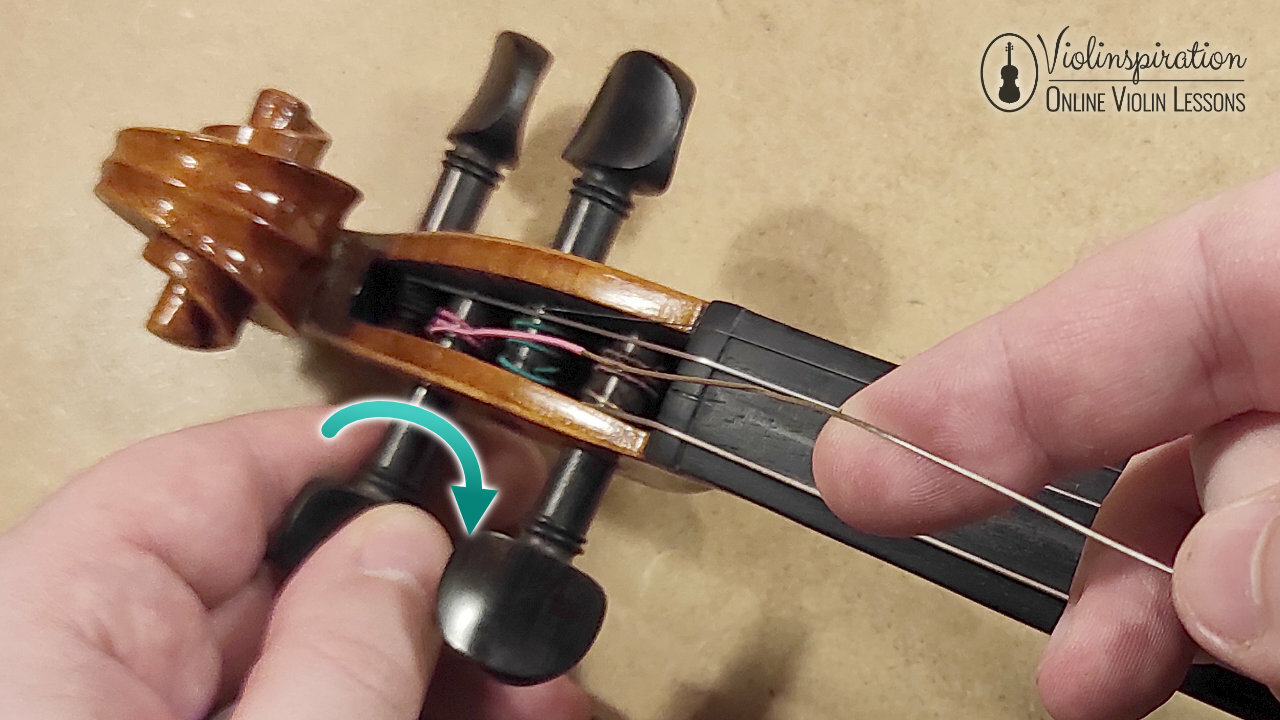
Step 5. Thread String Through Peg
Insert the peg into the hole from the outside, until the small hole in the peg is visible on the inside of the pegbox.
Poke the end of the string through the small hole in the peg. Allow a small amount to stick out on the other side, maybe just under an inch (2cm) or a bit more. The length of the string coming through will determine the angle of the peg once the string is tuned. If later on you want to adjust this angle, you can unwind the string and change how much of it sticks out. For now, what matters is that there is enough for the string to not slip out of the peg.
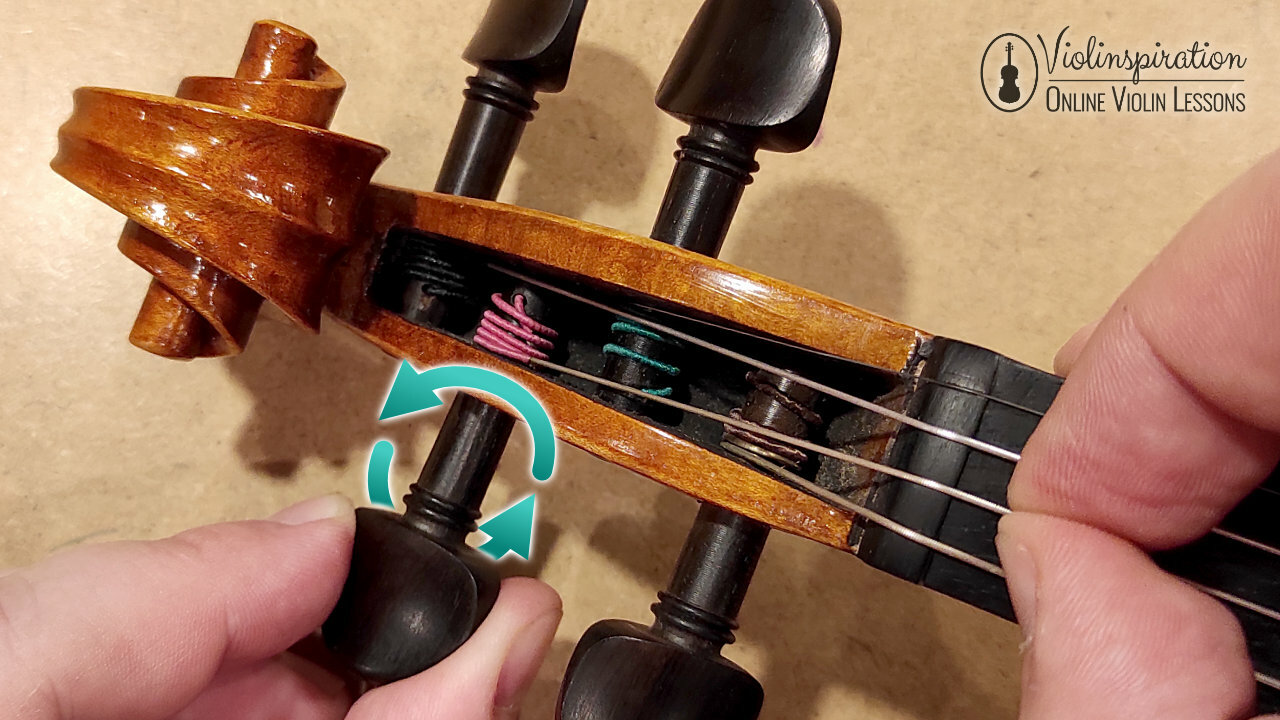
Turn the peg in the direction of the back of the violin.
As you do this, let the newly wound string go over the bit you left sticking out, so it holds it down. Continue to wind the string in such a way that the later bits go between the first loop and the wood of the pegbox. This will create tension that will keep the peg from unwinding and pulling out of the pegbox.

Step 6. Insert the Ball End Into the Tailpiece
Once you have wound enough of the string around the peg so it is secure, but not too much, insert the ball end of the string into the tailpiece.
Strings can also come with a hook end, which has its own adjuster, but for most users, it’s easier and cheaper to use strings with a ball end.
If you are using fine tuners, the ball hooks in between the two prongs of the fine tuner. Otherwise, it slides into the hole in the tailpiece. You may need to use something like the tip of a pencil to push the end of the string into the hole.

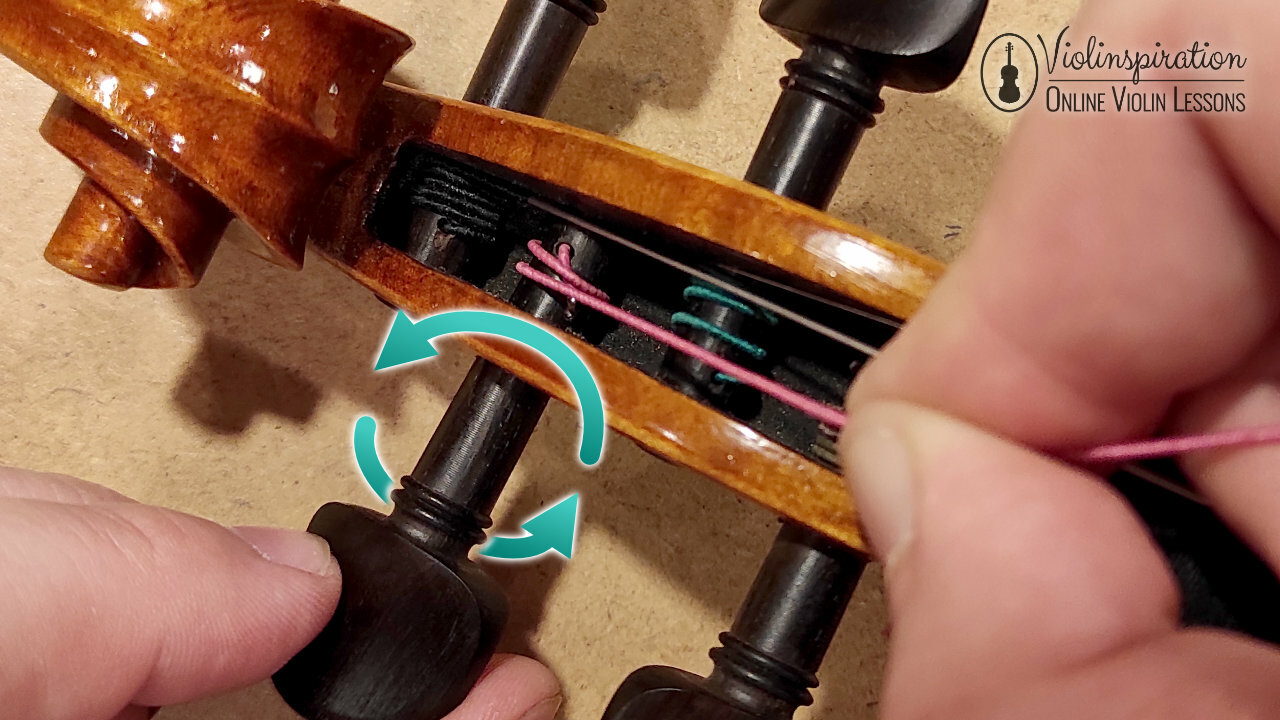
Step 7. Reduce the Slack
At this point, you should have a string that is attached at both ends but still hangs relatively loose on the body of the violin.
Holding the loose string with one finger, so it’s tight, which will ensure the ball end stays in its place, as you gently wind the string further to take off the slack. Do this slowly, so you can guide the string into the relevant groove on each end.

If this is the E-string and your string has a bridge protector, now you need to make sure this tube lands on the groove in the bridge. Tighten the string further, just until the slack is removed, and the string is secure.

Tune the string to roughly the right pitch. You can either check this using a tuner app, online tuner, electric tuner, or by playing the right note on a piano or tuner fork.
If you need help in tuning, read my two posts about this topic:
if you don’t have fine tuners
Whatever you do, perform this step slowly, so as not to break a string from over-tightening it.
Step 8. Check if the Bridge is Straight
When the string is more or less in tune, we need to check if the bridge is still straight. No matter how carefully we fit the new strings, the bridge can still go out of alignment. Make sure it is sitting firmly and flatly on the wood, and it goes across the body between the f-hole notches, not diagonally.
Step 9. Final Tuning
Now you can tune the string to its proper pitch, finishing with the fine tuners if you have them. Strings will take anything from 3 to 7 days to settle fully. During this time they will sound strange and go out of tune quite often. Readjust the tuning when needed.